Make Your Own Wedding Registry Page! (Step-by-Step)
Ingredients
STEP 1. Make a webpage (it's freeeee)
You'll of course need a website. The sample page was created with Weebly (so is my website for that matter). It's a super user-friendly, free service. There's a few different companies but Weebly has worked great for me in every department. But note: it's only free if you're fine with the website name being www.YourRegistryNameHere.Weebly.com. If you want www.YourRegistryNameHere.com you'll have to pay for that domain name.
Go to www.weebly.com, make an account, follow their steps to make a webpage, choose a design, then leave it to chill in the fridge for a while. We'll come back to it.
Note: if you already have a website service that you prefer, no problem, the steps might just be a bit different!
STEP 2. Create Paypal Account
If you don't already have a Paypal account from all your notorious eBay purchases (I know I have a problem), sign up for one. You'll need it so people can pay you with Visa/Mastercard etc. Head to Paypal.com and Sign Up.
STEP 3. Add Banking Information to Paypal
Next you'll need to add your banking info so you can withdraw your Paypal money.
Login to your Paypal account and go here:
- A website (I'll explain how to make one)
- Ideas of things you'd like your guests to donate towards
- A Paypal account
- Baking powder (optional)
STEP 1. Make a webpage (it's freeeee)
You'll of course need a website. The sample page was created with Weebly (so is my website for that matter). It's a super user-friendly, free service. There's a few different companies but Weebly has worked great for me in every department. But note: it's only free if you're fine with the website name being www.YourRegistryNameHere.Weebly.com. If you want www.YourRegistryNameHere.com you'll have to pay for that domain name.
Go to www.weebly.com, make an account, follow their steps to make a webpage, choose a design, then leave it to chill in the fridge for a while. We'll come back to it.
Note: if you already have a website service that you prefer, no problem, the steps might just be a bit different!
STEP 2. Create Paypal Account
If you don't already have a Paypal account from all your notorious eBay purchases (I know I have a problem), sign up for one. You'll need it so people can pay you with Visa/Mastercard etc. Head to Paypal.com and Sign Up.
STEP 3. Add Banking Information to Paypal
Next you'll need to add your banking info so you can withdraw your Paypal money.
Login to your Paypal account and go here:
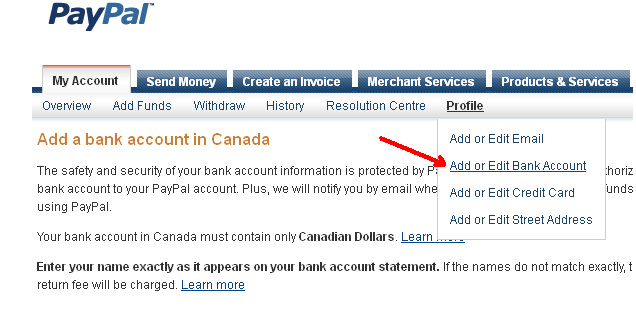
Fill out your banking information with a check in hand. Paypal will then deposit some small amounts of money in your bank for verification (thanks for the 22 cents guys!)
This will take a few days to verify, fyi.
STEP 4. Build that Beautiful Website
Now that your website is nice and chilled, let's get working on it again. I'm hoping the Weebly interface is reasonably intuitive for most, but I can guide you a bit if you're stuck.
You'll see a bar like this:
This will take a few days to verify, fyi.
STEP 4. Build that Beautiful Website
Now that your website is nice and chilled, let's get working on it again. I'm hoping the Weebly interface is reasonably intuitive for most, but I can guide you a bit if you're stuck.
You'll see a bar like this:

Here you can edit the theme (Design tab), add paragraphs and such (Elements Tab) and add any other pages/ change page layout (Pages Tab).
Open up my sample website in another tab for reference.
You can customize yours how you like by adding your own photo (where I have the flowers) etc. etc.
STEP 5: Create your item list
Next step is to create the item list and "Make a gift" button:
Open up my sample website in another tab for reference.
You can customize yours how you like by adding your own photo (where I have the flowers) etc. etc.
STEP 5: Create your item list
Next step is to create the item list and "Make a gift" button:
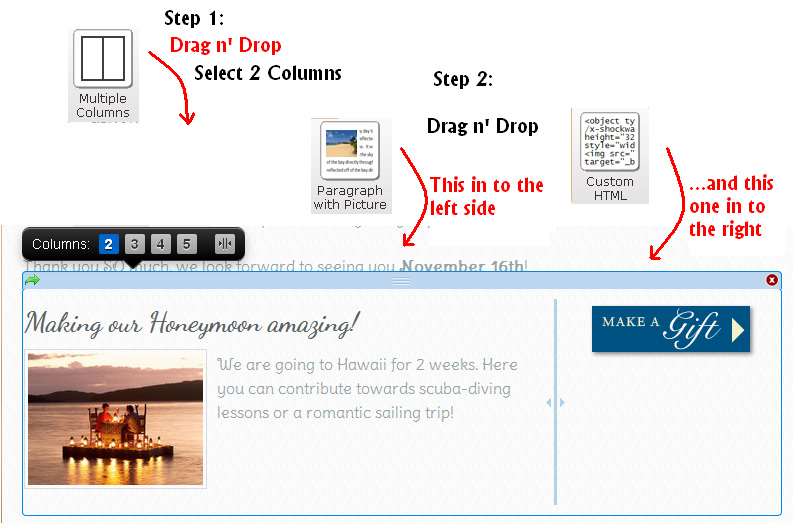
On the left side, fill in the Title, info and add a nice picture, similar to above, with one of your chosen items. Repeat this step for as many items as you have. Don't worry about that "Custom HTML" part yet!! we'll get to that in the next step.
STEP 6: The Donation Button.
Now for the trickiest part (but still not that tricky) is to make the Paypal button, like my "Make a Gift" button above.
Go to your Paypal account and go here:
STEP 6: The Donation Button.
Now for the trickiest part (but still not that tricky) is to make the Paypal button, like my "Make a Gift" button above.
Go to your Paypal account and go here:
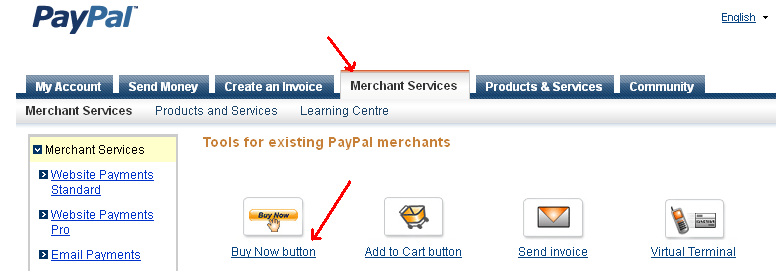
You're going to create a "Buy Now" button that will bring your guests to Paypal, where they can donate a multiple of X dollars.
There are 3 necessary steps on the Make-a-Button page. Fill in the following:
As for the button itself, you can either use the Paypal default "Buy Now" button, or you can choose a custom button, like my "Make a Gift" button. If you're OK with the default button then you can skip the next step. If you'd like a custom button, head on over to Step 7.
STEP 7 - Customize your button
On Paypal's button creation page, look for the option under the "customize button" section for "Use custom image." Here you will need to give a URL (website address) of an image you want to use as your button.
You can either create your own image and upload it to a website, or the easier option is to "borrow" someone's button from an existing website...but you didn't hear that from me ;)
To do this, Google Image the phrase "Make a gift button" or "Donate button" or whatever you prefer, then click on the image you like. Follow the link to the corresponding website where the button image is located. Find the button, right-click on it and hit "copy image location." Go back to the Paypal website and paste the URL into the given space. Tada! (Note: the image doesn't show up on the Paypal website, but it will work on your page!)
STEP 8 - Put that shiny new Paypal button on to your site!
Next, on your Make-A-Button page, go to the bottom and click the "Create Button" and it will bring you to a box of complicated looking code. Click "select code" and go Edit-Copy. Then head back to your website. In those Custom HTML boxes, hit Edit-Paste. And POOF! if all went as planned your button should be there, ready to be clicked!
You'll need to repeat this process for all your buttons, simply by going back and changing the Item Name. That way, you can see that Uncle John gave you money towards a new car and Aunt Mary donated towards your honeymoon.
When your guests pay you, it will show up in your Paypal account. From there you can "withdraw" your funds and send it to your bank account.
STEP 9 - Send out your tasty creation to everyone!
What's great is you can simply add this website address to your invitation, and all your registry stuff is taken care of! Phew, one less thing to think about.
If you have any questions, comment on this and I'll try to help.
There are 3 necessary steps on the Make-a-Button page. Fill in the following:
- Item name (example: Our first car)
- Price (put in increments of $10 or $20, how you like. Your guests will be able to select quantity, so if they want to donate $100 they select $20, quantity 5)
- Shipping and tax rate to Zero
- In Step 3, under "Do you want to let your customer change order quantities?" Select Yes.
As for the button itself, you can either use the Paypal default "Buy Now" button, or you can choose a custom button, like my "Make a Gift" button. If you're OK with the default button then you can skip the next step. If you'd like a custom button, head on over to Step 7.
STEP 7 - Customize your button
On Paypal's button creation page, look for the option under the "customize button" section for "Use custom image." Here you will need to give a URL (website address) of an image you want to use as your button.
You can either create your own image and upload it to a website, or the easier option is to "borrow" someone's button from an existing website...but you didn't hear that from me ;)
To do this, Google Image the phrase "Make a gift button" or "Donate button" or whatever you prefer, then click on the image you like. Follow the link to the corresponding website where the button image is located. Find the button, right-click on it and hit "copy image location." Go back to the Paypal website and paste the URL into the given space. Tada! (Note: the image doesn't show up on the Paypal website, but it will work on your page!)
STEP 8 - Put that shiny new Paypal button on to your site!
Next, on your Make-A-Button page, go to the bottom and click the "Create Button" and it will bring you to a box of complicated looking code. Click "select code" and go Edit-Copy. Then head back to your website. In those Custom HTML boxes, hit Edit-Paste. And POOF! if all went as planned your button should be there, ready to be clicked!
You'll need to repeat this process for all your buttons, simply by going back and changing the Item Name. That way, you can see that Uncle John gave you money towards a new car and Aunt Mary donated towards your honeymoon.
When your guests pay you, it will show up in your Paypal account. From there you can "withdraw" your funds and send it to your bank account.
STEP 9 - Send out your tasty creation to everyone!
What's great is you can simply add this website address to your invitation, and all your registry stuff is taken care of! Phew, one less thing to think about.
If you have any questions, comment on this and I'll try to help.